




ChatGPT can build you a website and publish it at an address ending in .chatgpt.site. It can also hand you the page as code, or draw you a picture of it. This guide shows how to get each of those onto WordPress as pages you edit by clicking, with the screens and times from our own tests in November 2026.
The quick answer
Make your ChatGPT site public and use its address, or ask ChatGPT for the code and paste it. Either way you end up with real WordPress pages built with Elementor, and Elementor's own version is enough: you don't need Elementor Pro.
| What ChatGPT gave you | What it is | What to do |
|---|---|---|
An address ending in .chatgpt.site | A published ChatGPT site | Make it public, then use the address |
| Code in the chat (HTML, sometimes with CSS and JavaScript apart) | The page as code | Paste the whole answer, or save it as a file and upload it |
A link that starts with chatgpt.com/s/ | A picture of a website | Use the image converter |
Why move a ChatGPT site at all
A ChatGPT site is quick to make and awkward to live with. Every change is another prompt, and on a long page a new prompt can undo something that already worked. The site also lives inside your ChatGPT account, at ChatGPT's address.
On WordPress the site is yours. You change a headline by clicking it. You add a blog, a contact form or a shop when you need one. You can hand the whole thing to a client or a colleague without sharing your ChatGPT login.
If none of that matters to you, leave the site where it is. It works.
First, get your site out of ChatGPT
If you have a .chatgpt.site address
A new ChatGPT site is private. Anyone else who opens the address is asked to sign in, and that includes any tool you paste the address into. Open Share and choose Anyone on the internet. If you don't see that option, your workspace has public sharing turned off.
Once the site is public, paste its address into the website converter, or into Website Importer PRO if you want it built inside your WordPress.
Can't make it public? Ask ChatGPT for the code instead:
Give me this site as one single HTML file.
If you have code
Copy all of it. You don't need to separate the HTML from the CSS and the JavaScript, or cut out the sentences ChatGPT wrote around the code.
If you are starting from zero, this prompt gives a page that moves cleanly:
Create a one-page website for my bakery, Golden Crust Bakery, in a single HTML file using HTML and Tailwind CSS. Use full image URLs (https:// links, not local files) and a top menu that links to each section. No pop-ups and no scroll animations.
The full https:// image links matter. AI tools like to write file names such as images/bread.jpg, and a file that only exists in the chat can't load anywhere else.
If you have a picture
Ask ChatGPT for a landing page without saying "code" and it often draws one. That picture can become a page too. Upload it to the image converter and you get an Elementor template built from it. It is a reading of the picture, not a pixel copy, so expect to adjust the spacing and swap the images.
Put it on WordPress with the plugin
This is the road for a whole website, because the plugin sets up the home page and the menu for you. We ran it on a clean WordPress with the version on WordPress.org.
1. Install the plugin and get Elementor ready
In WordPress, go to Plugins → Add New, search for Web2 - HTML to Elementor Converter, install it and activate it. It is on WordPress.org. Then open Web2 HTML to Elementor in the WordPress menu. The screen has three steps across the top: Connect your account, Get Elementor ready and Build your site.
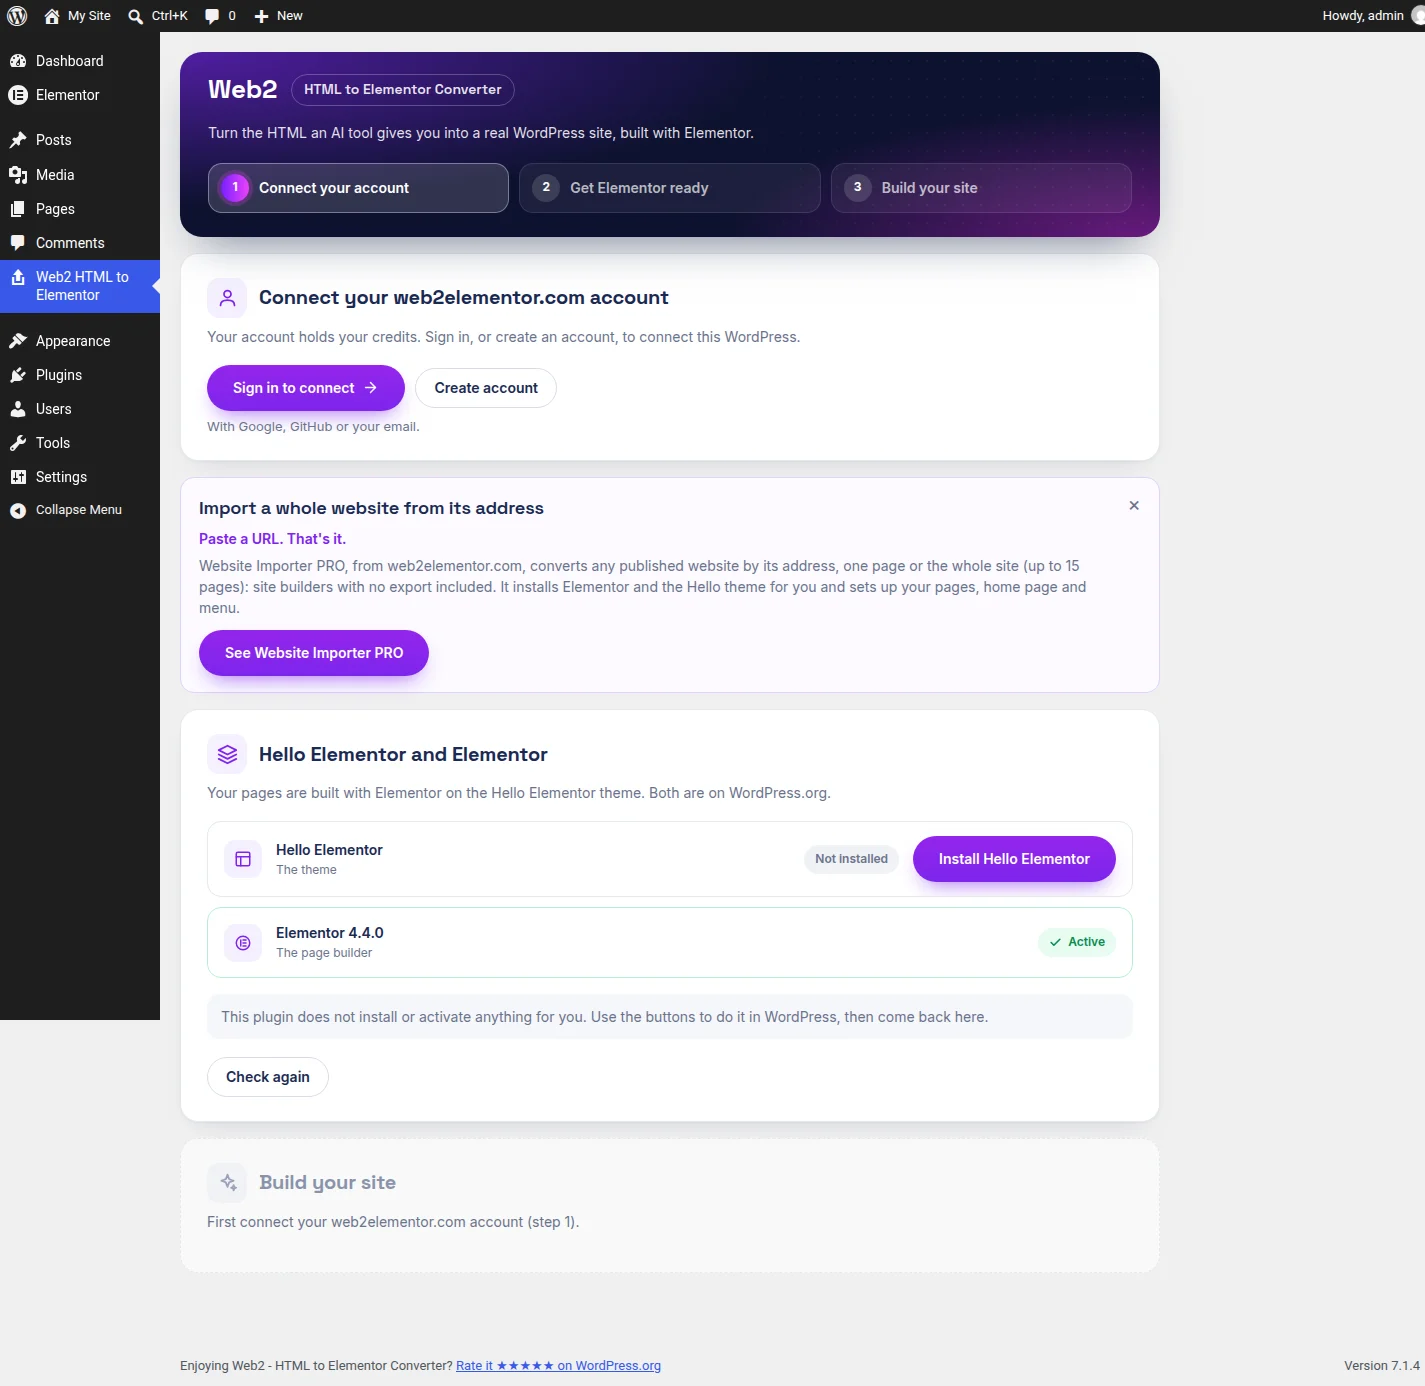
Click Sign in to connect, or Create account if you are new. You sign in with Google, GitHub or your email and approve a short code in your browser. There is no API key to copy. In our test the plugin showed "Connected" about eight seconds after the code was approved.
The plugin does not install anything behind your back. If the Hello Elementor theme or Elementor are missing, it shows a button for each one, you install them from WordPress and click Check again.
2. Paste the answer, or upload the file
Step three has two tabs, and they end in the same place.
- Paste HTML. Paste the whole answer ChatGPT gave you, sentences included. You don't have to find where the code starts: the plugin keeps the code and drops the text around it. If the CSS came in its own block, there is a second box for it.
- Upload a file. Choose your .html files, with their .css and .js if they came apart. You can also drop them on the box.
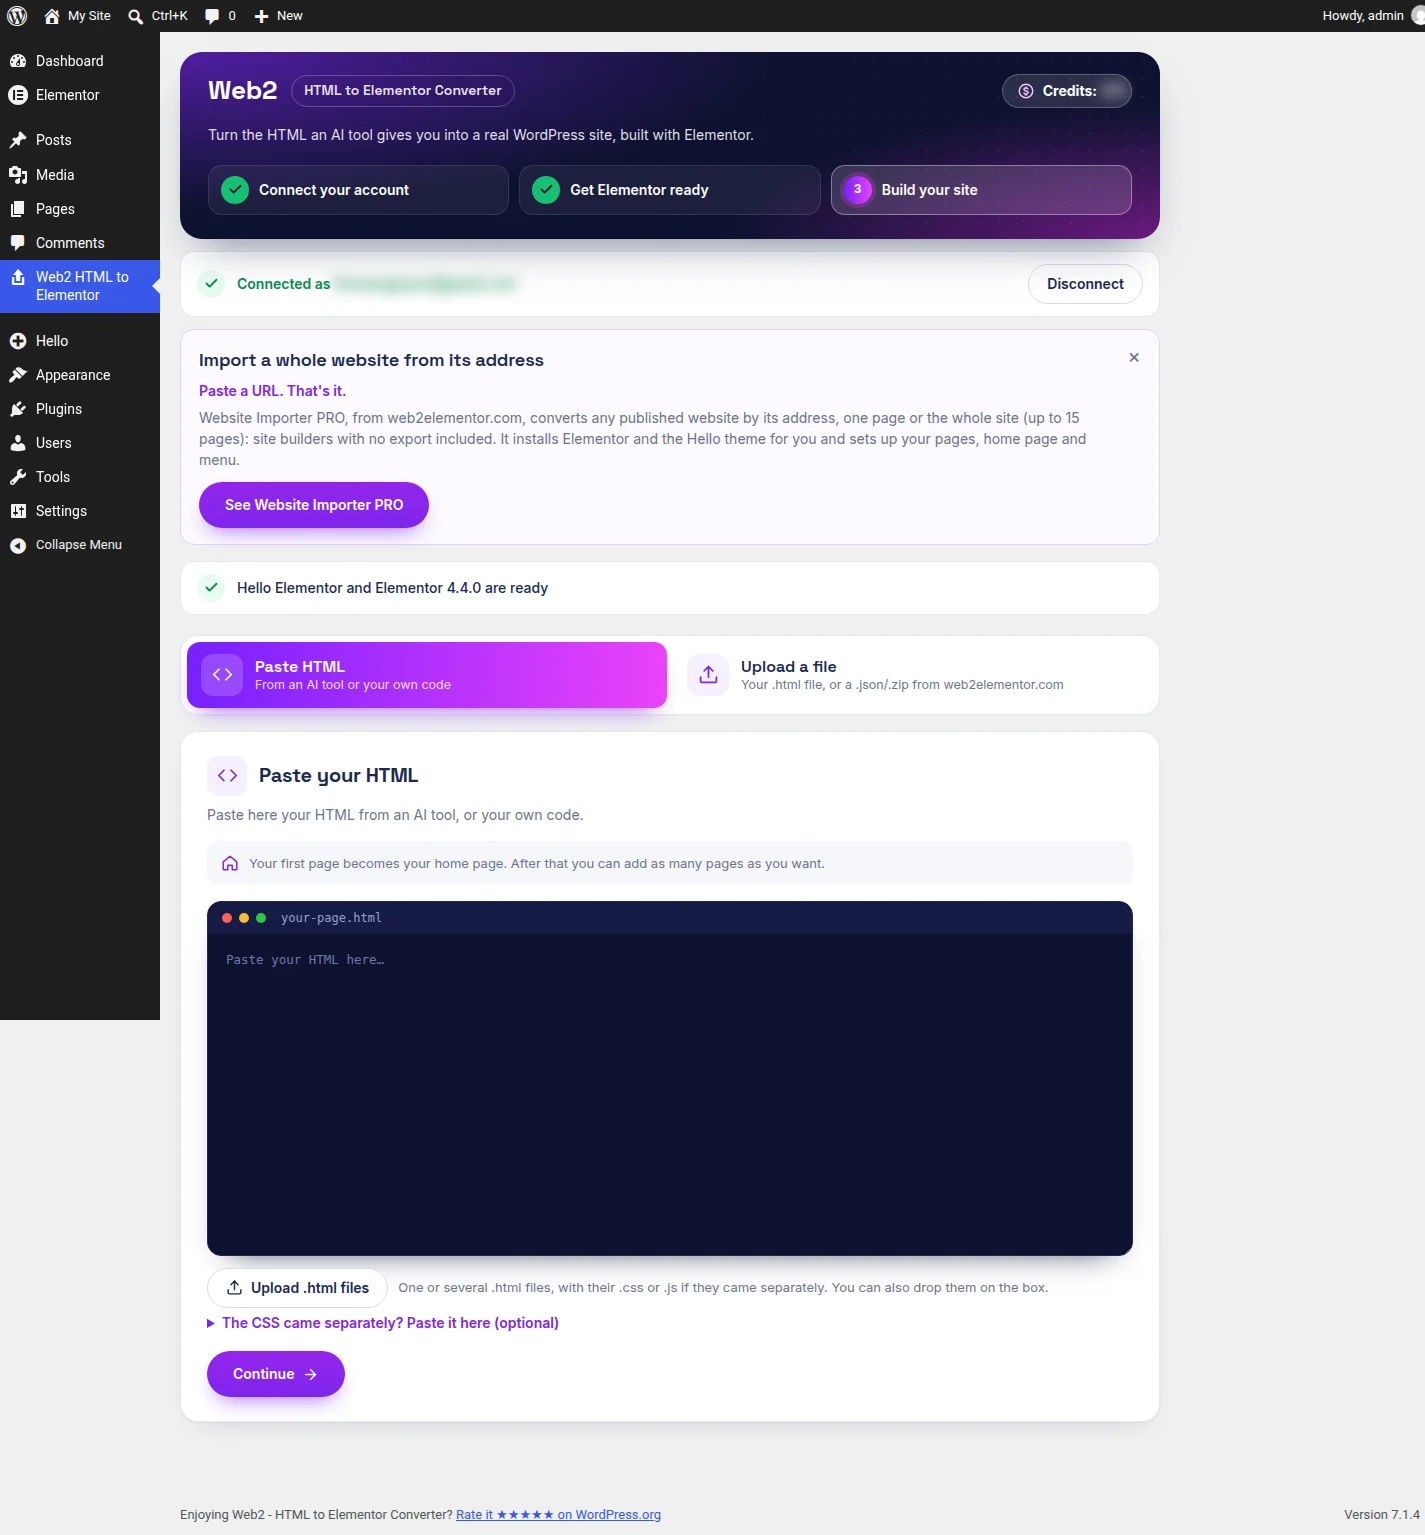
The note above the box says what happens next: "Your first page becomes your home page. After that you can add as many pages as you want."
3. Check what the plugin found
Click Continue and you get a summary before anything is built. For this guide we asked for a three-page website for a yoga studio (home, classes and contact) and pasted the whole answer. The plugin wrote: "Your answer has 3 pages: index.html, classes.html and contact.html." The first becomes the home page. Each of the others gets an address you can change in the box next to it. This is that screen:
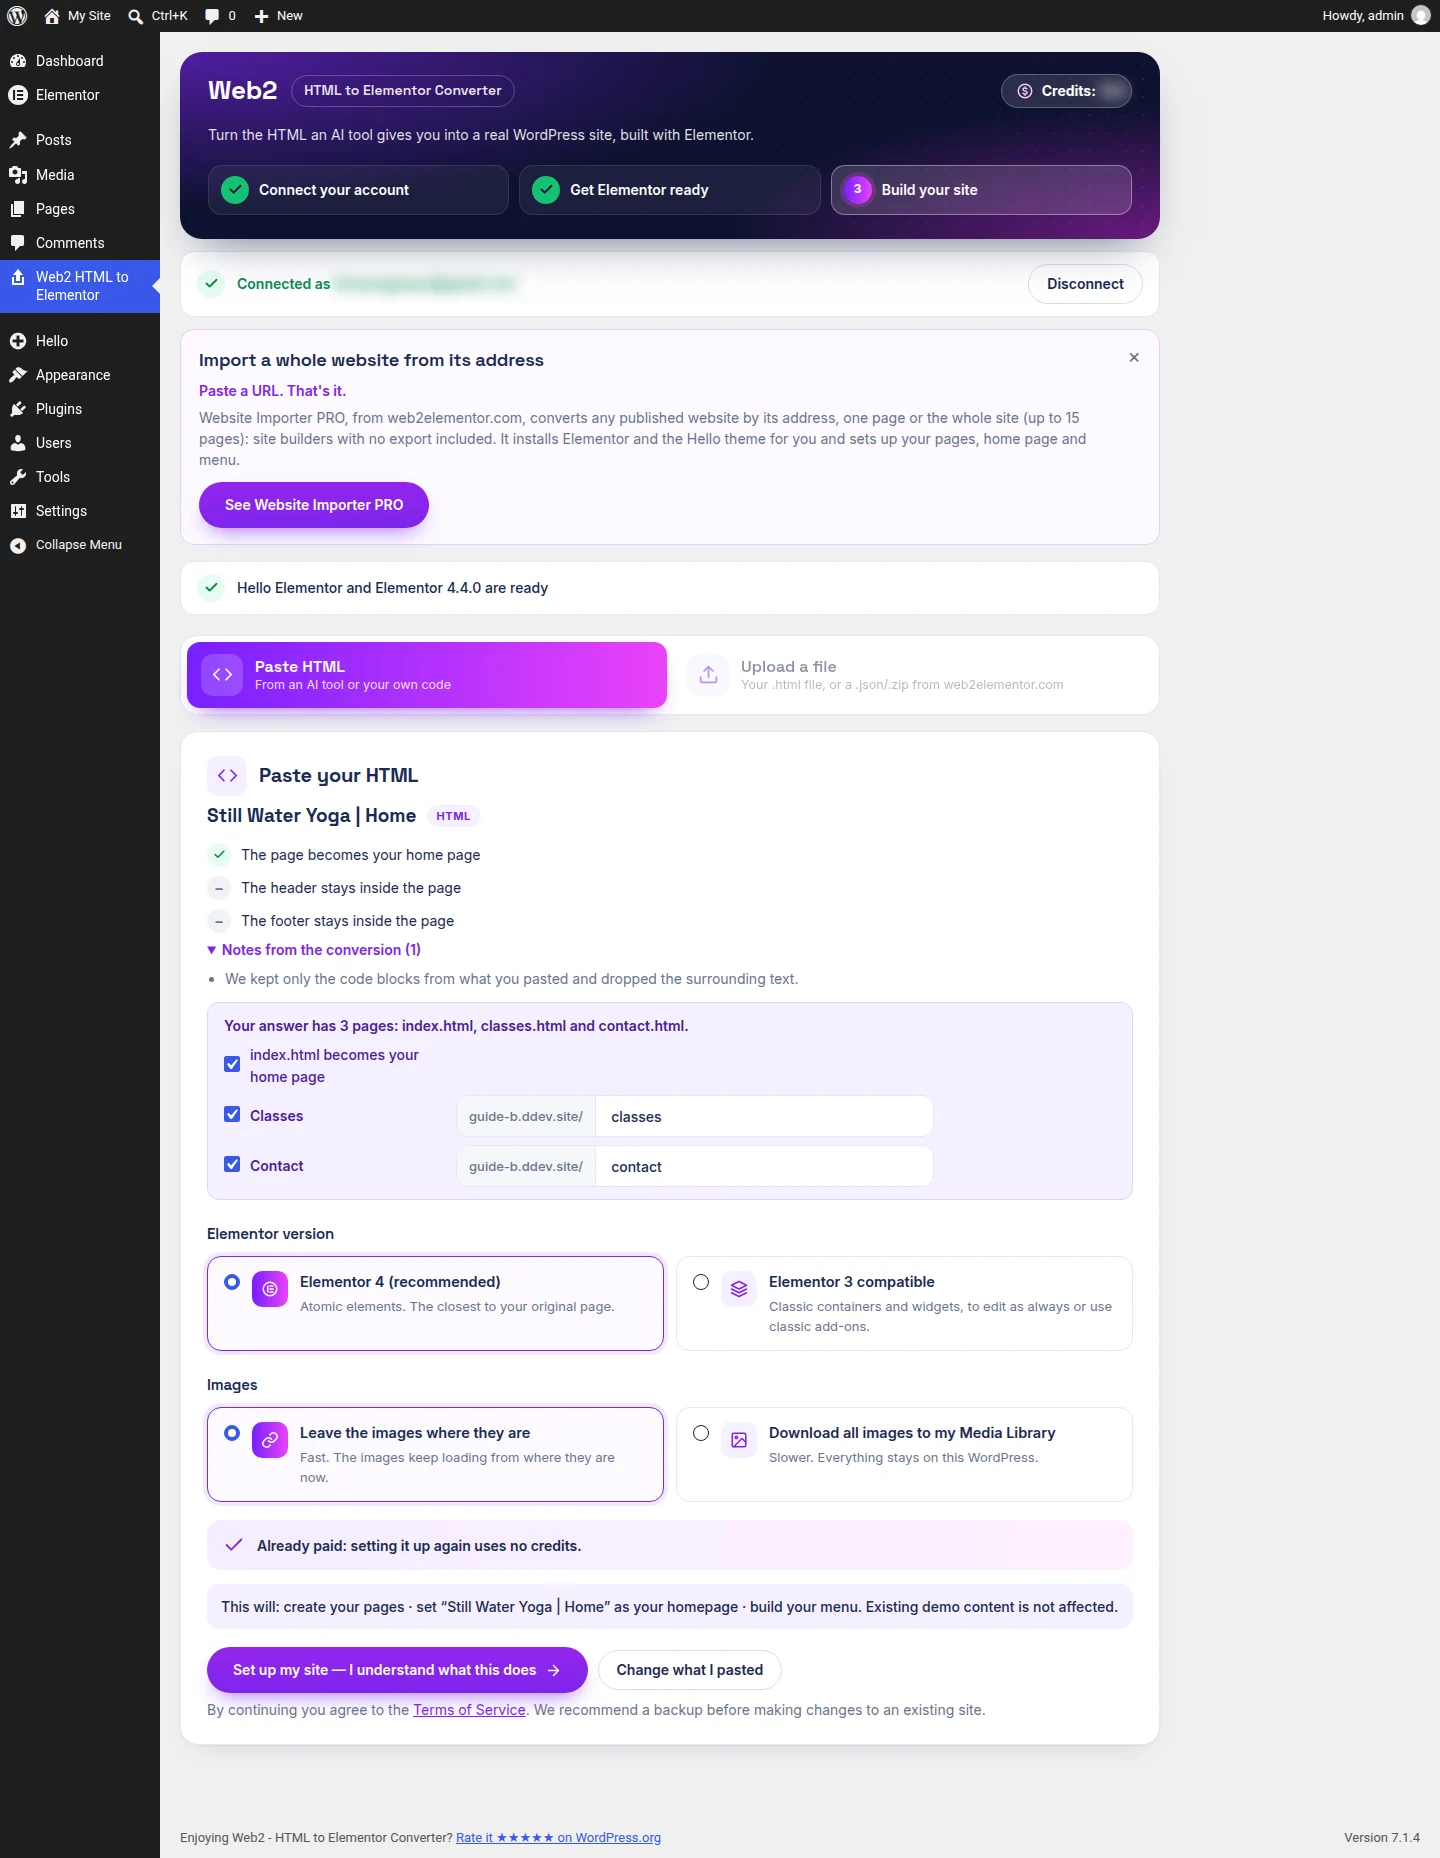
Two choices sit below the list:
- Elementor version. Elementor 4 (recommended) is the closest to your original page. Elementor 3 compatible uses classic containers and widgets, for people who work with classic add-ons.
- Images. Leave the images where they are is fast: they keep loading from their current address. Download all images to my Media Library is slower and keeps everything on your WordPress.
The price in credits is on this screen too, before you accept. Then click Set up my site — I understand what this does.
4. Open your site
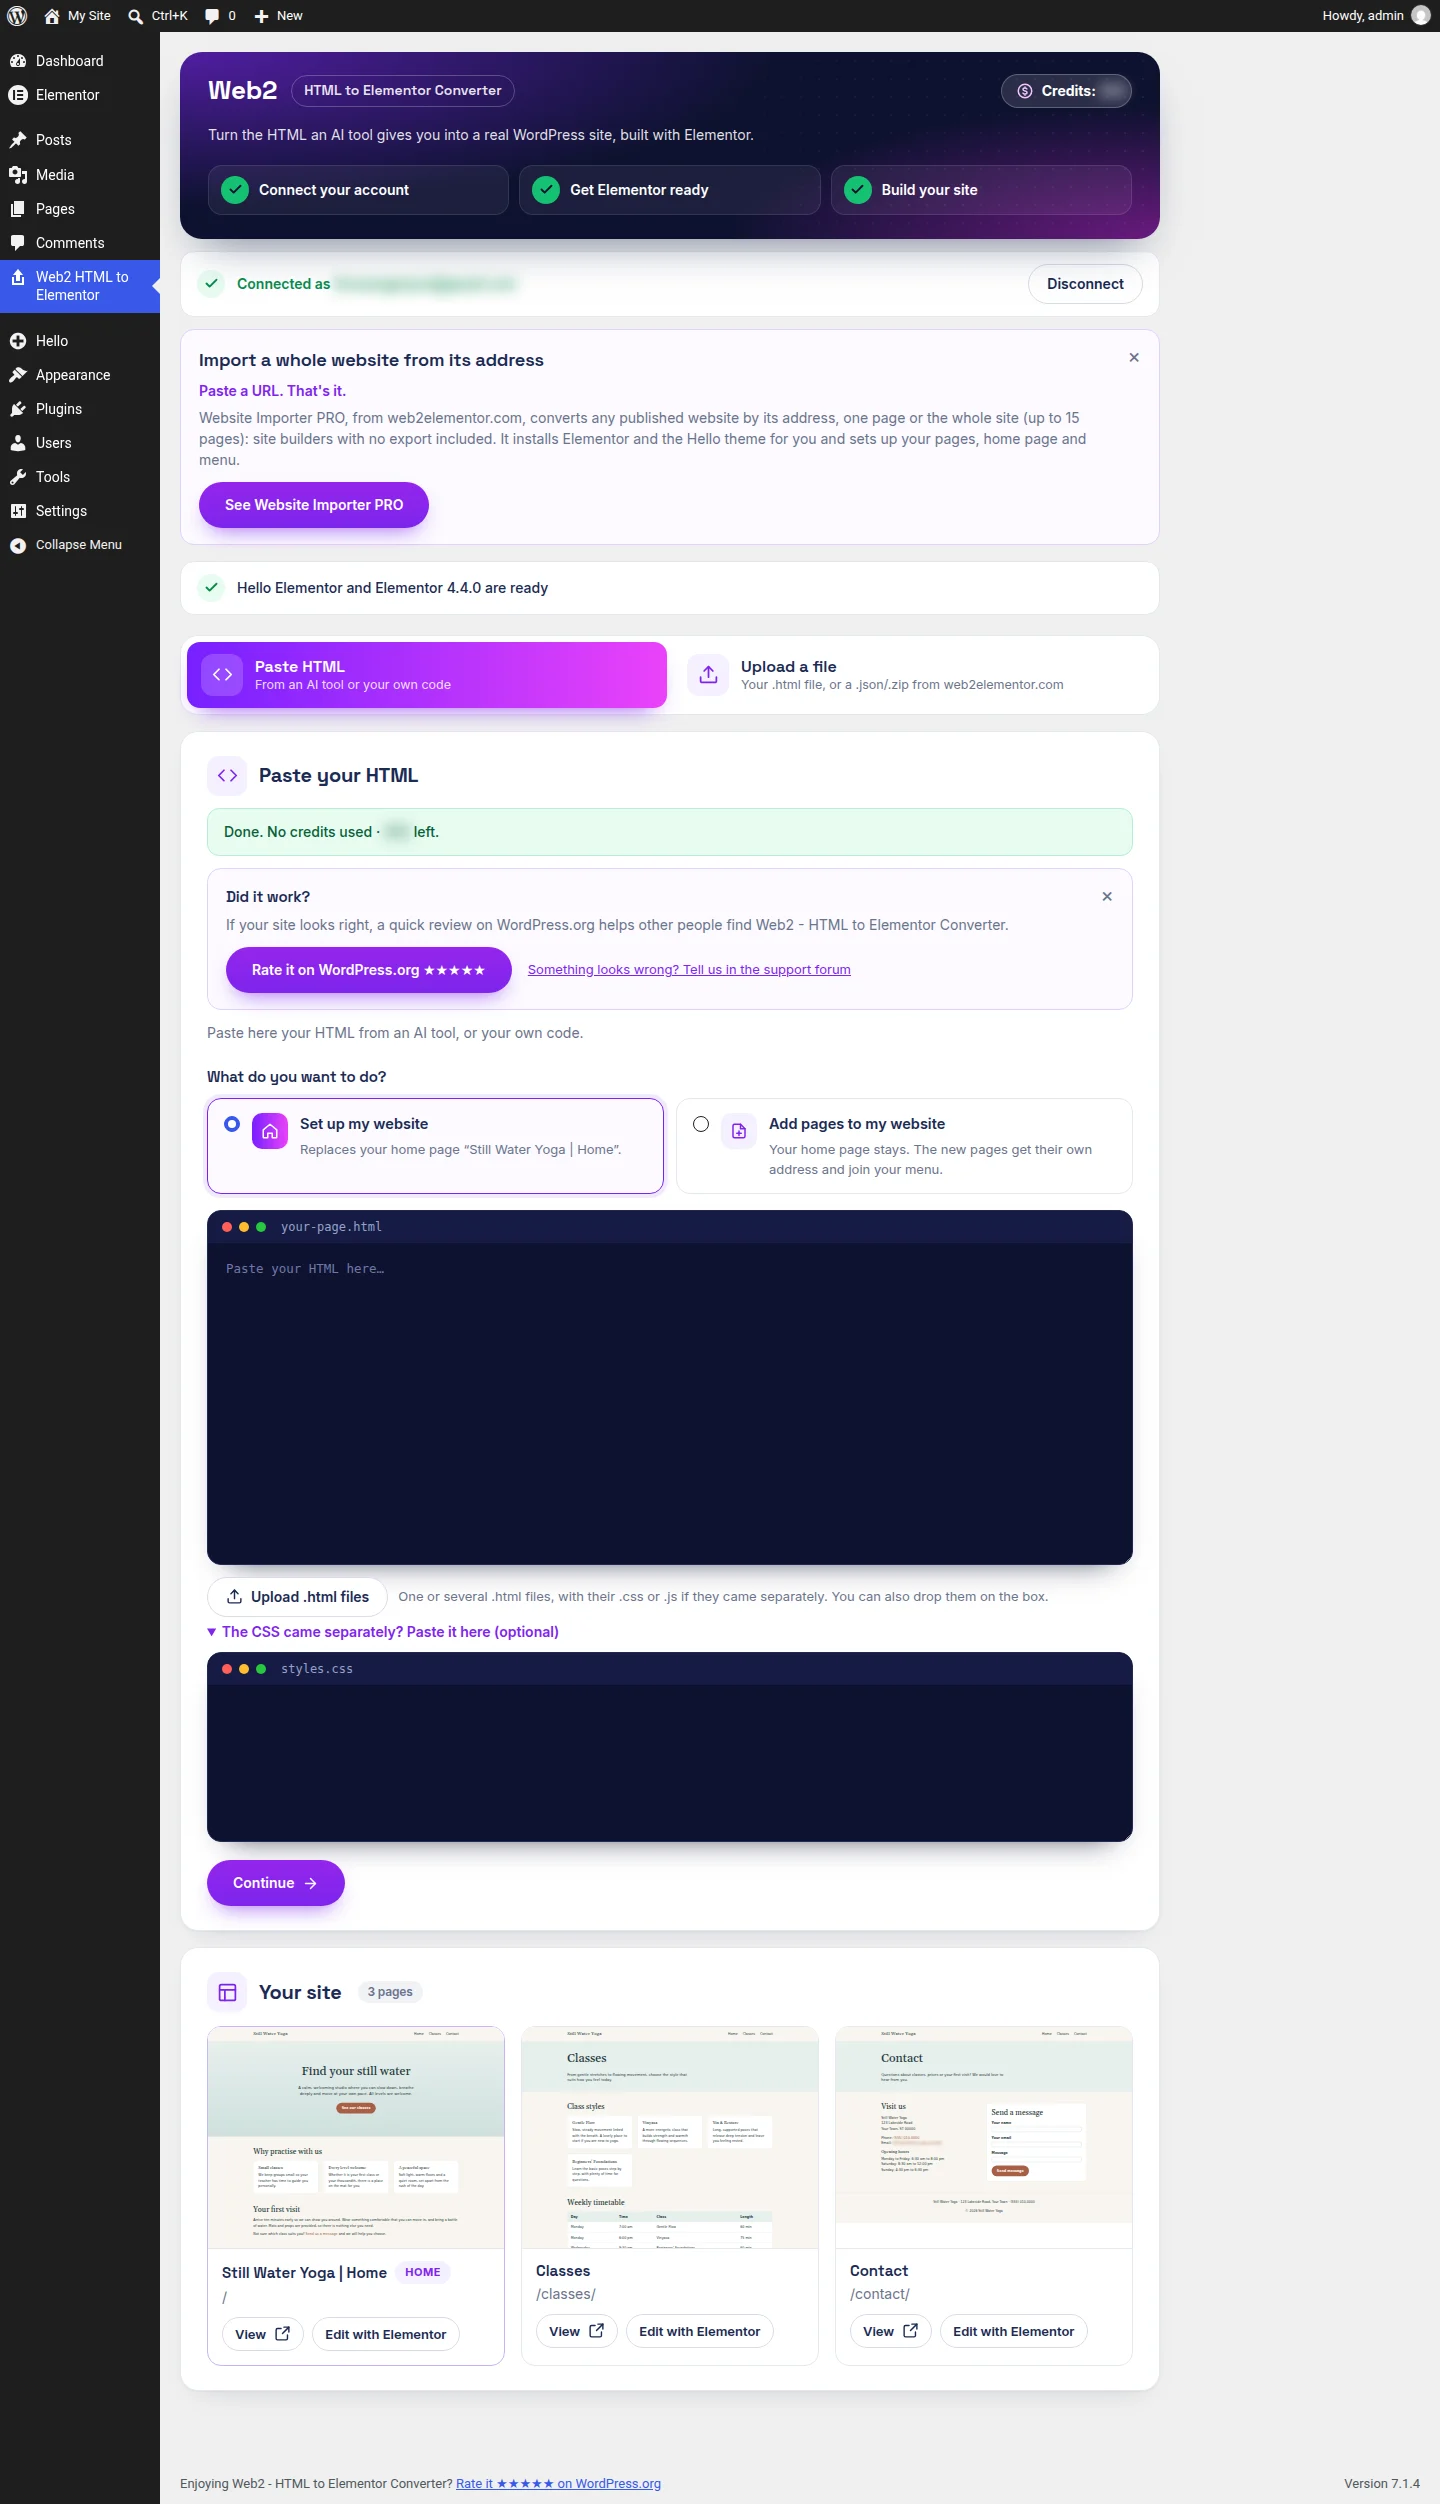
The three pages of the yoga studio were ready about 40 seconds later. The plugin lists them under Your site, each with View and Edit with Elementor:
And this is the home page of that yoga studio, now a WordPress page. On the left, on a desktop screen (scroll inside the frame to see it all). On the right, on a phone:
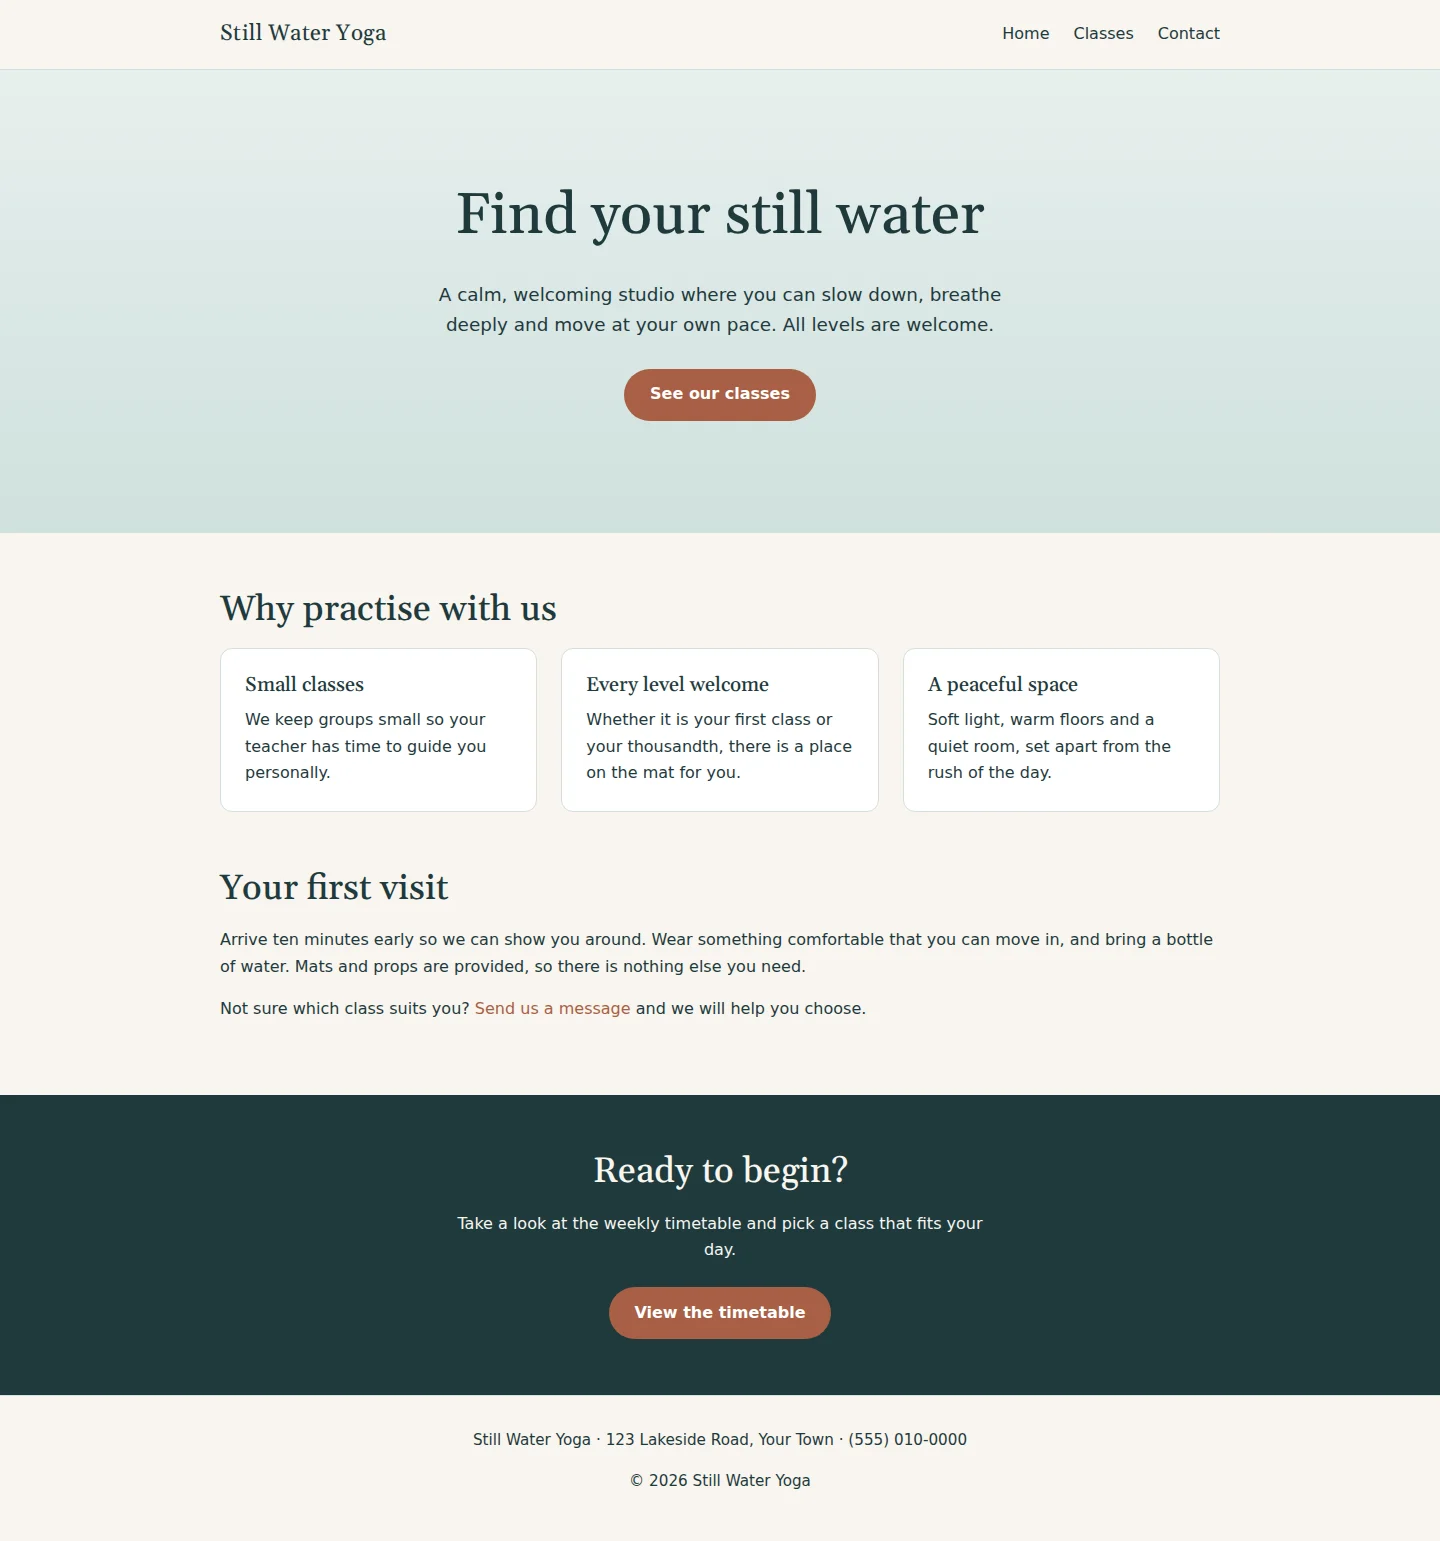
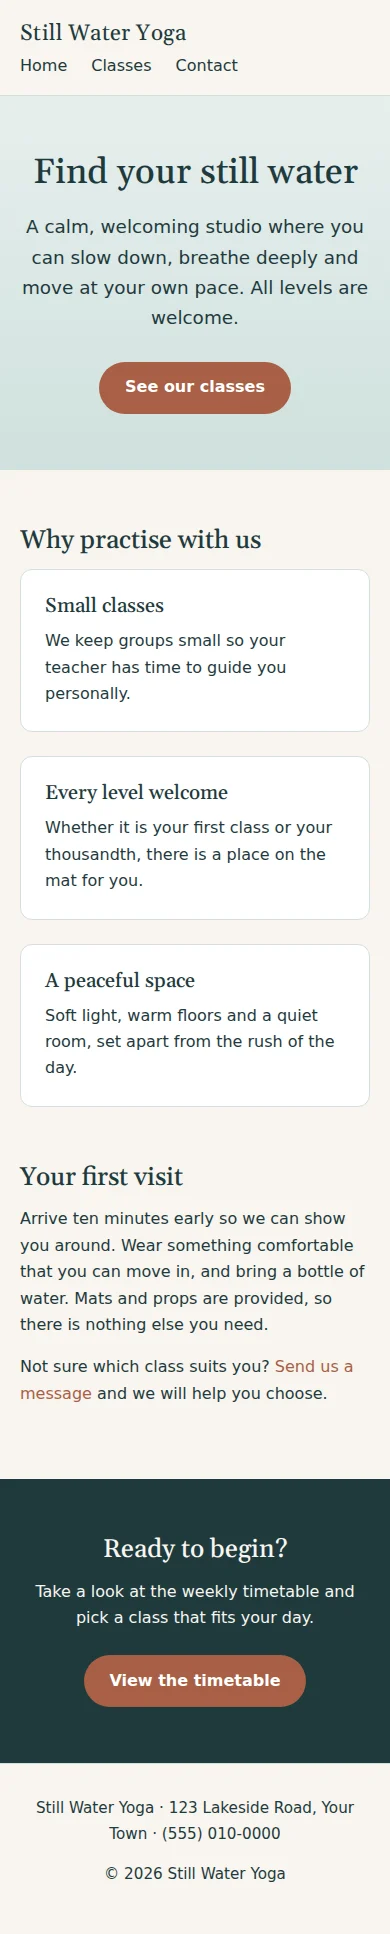
The menu at the top links the three pages. So do the buttons inside them: a button that pointed to classes.html in the original now opens the Classes page in WordPress.
Have a public address? Import it with Website Importer PRO
Website Importer PRO is our second WordPress plugin. It has the same Paste HTML and Upload a file tabs, and a third one the WordPress.org plugin does not have: Import from a URL.
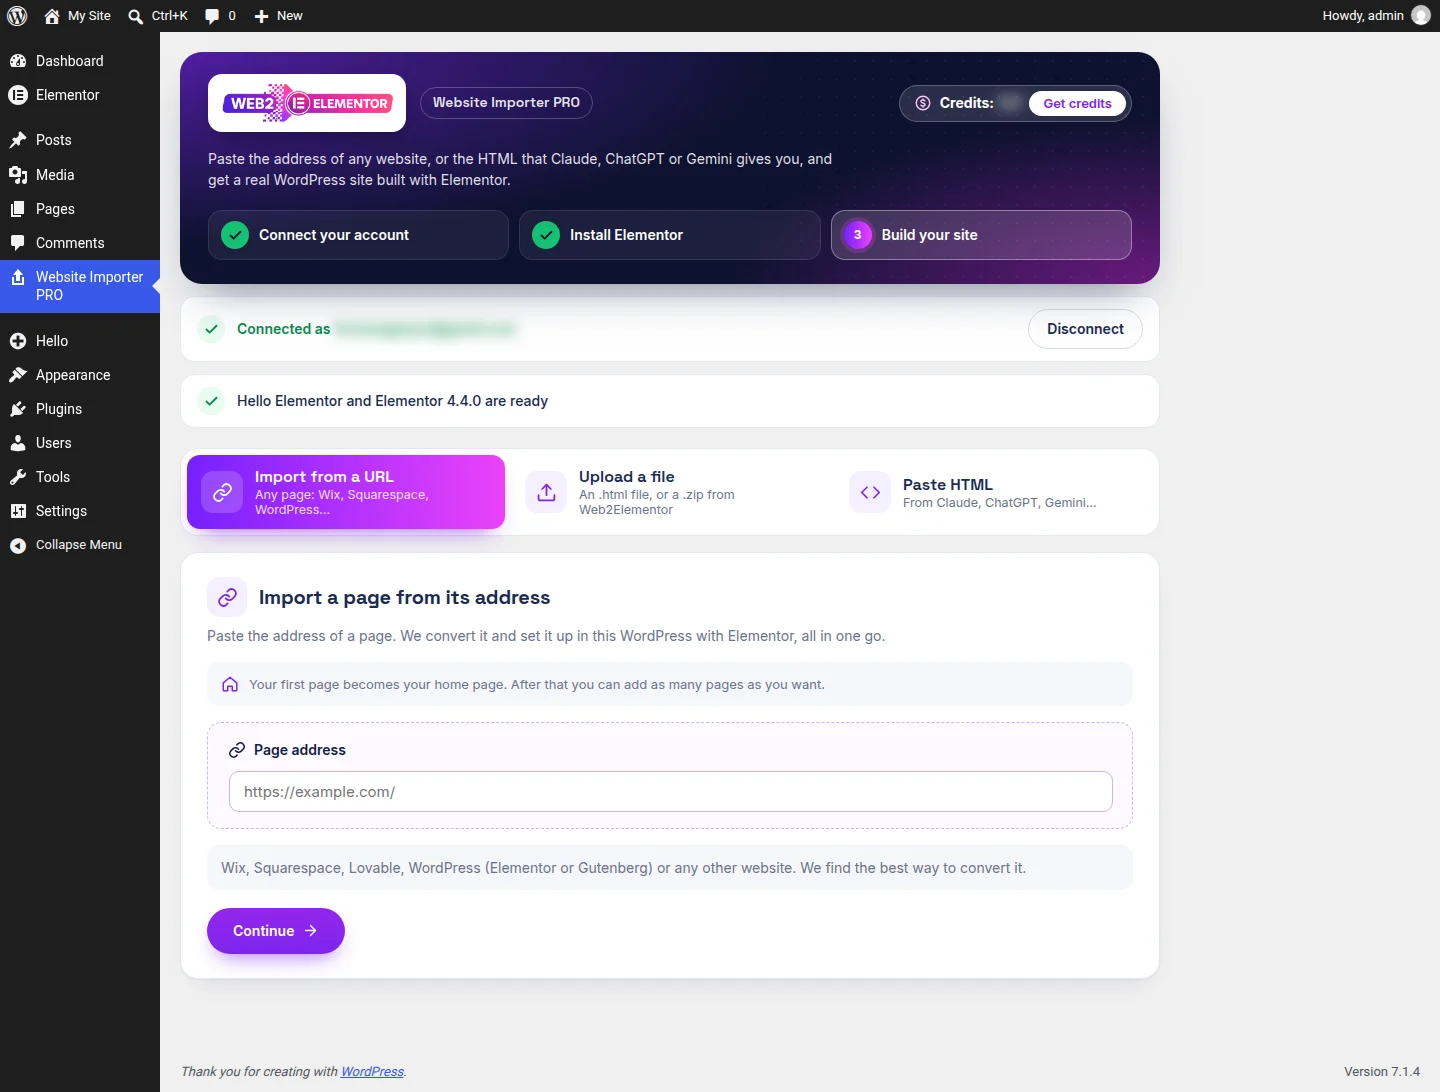
- Upload the plugin in Plugins → Add New → Upload Plugin and activate it. Click Install and activate and it installs the Hello Elementor theme and Elementor for you. That took 9 seconds in our test.
- Connect your account, the same way as in the other plugin.
- Paste the address in Page address and click Continue. The plugin looks at the website and, a few seconds later, lists the pages it found, each with a checkbox and its future address. It takes the main page and up to 14 more.
- Untick the pages you don't want and accept.
We tried it with a site published by an AI builder. The home page was in WordPress about 46 seconds after we accepted, and each extra page took a little over a minute. Importing from an address has one advantage over pasting: the site's header and footer arrive as Elementor templates, so you edit them once for every page.
Check your internal links afterwards. Links to pages you imported point to their new WordPress address. Links to pages you left out go nowhere until you import those pages or change the link.
One limit to know: some ChatGPT sites are apps that only draw themselves in the browser, and those do not always convert from their address. If yours comes out empty, ask ChatGPT for the site as one HTML file and paste that.
Just one page? Use the web converter
- Open the HTML to WordPress converter and paste the code, or upload the .html file.
- Click Convert and download your template.
- In WordPress, go to Elementor → Templates → Saved Templates → Import Templates, upload the file and insert it into a page.
This is the short road for one page. For several pages, or if you want the home page and the menu set up for you, use the plugin.
Add more pages later
Ask for the next page in the same chat, so ChatGPT keeps the style:
Now make me the About us page with the same style
Go back to the plugin and paste the new answer. Because your site already exists, the plugin now asks "What do you want to do?" and gives you two options:
- Set up my website replaces your home page with what you paste.
- Add pages to my website. In the plugin's words: "Your home page stays. The new pages get their own address and join your menu."
Choose Add pages to my website. We did this with a bakery site and its About page. The summary said "A new page, exactly as it is in the file" and "'About Us' is added to your site's menu", proposed the address about-us (you can change it) and showed the price. We clicked Add this page — I understand what this does, and the page was live 31 seconds later.
Two details from that test, so they don't surprise you:
- The plugin adds the new page at the end of your home page's menu. A link you already had, like our "Our Story" that jumped to a section of the home page, keeps doing what it did. Change it in Elementor if you want it to open the new page.
- If the AI already wrote an "About Us" link in the new page's own menu, you will see it twice there. Delete one in Elementor.
Already have a WordPress site?
The plugin notices and tells you: "This site already has content… We won't touch your current theme, pages or menu — your imported pages will be added alongside them."
We tried it on a site with its own theme, home page and menu, and pasted a landing page. The summary read "The page is added to your site; your homepage stays as it is", and the button changed to Add this page — I understand what this does. The page was built in about 24 seconds. The home page and the menu looked the same before and after.
What moves and what doesn't
What moves is the design of each page: layout, text, images, buttons and menu, as Elementor elements you click and edit.
What stays behind is anything that needs a server or custom code:
- Forms. They arrive drawn on the page, but they are not working forms. Replace them with a form widget or a form plugin in WordPress.
- Logins, member areas and databases.
- Shops, bookings and blog posts.
- Pop-ups, scroll animations and other custom JavaScript.
FAQ
Yes. Make the site public from Share and use its address, or ask ChatGPT for the site as one HTML file and paste it. You get WordPress pages built with Elementor that you edit by clicking.
New ChatGPT sites are private. Open Share and choose Anyone on the internet to make the address work for everybody.
No. Paste the whole answer, or upload the .html file together with its .css and .js files. The plugin puts them back together.
No. The pages are built with Elementor itself, in Elementor 4 or in an Elementor 3 compatible version.
No. Moving the site copies its design to WordPress. Nothing changes in ChatGPT.
No. A form arrives drawn on the page but it does not send anything. Replace it with a form widget or a form plugin in WordPress.
Used another tool, or comparing roads? See 4 ways to put an AI-built website on WordPress. Built the site with Claude instead? See how to download a Claude artifact and put it on WordPress. Your account also works in the web converters and the Chrome extension.